


With the help of Jenkins, we can continuously execute the Selenium Automation scripts on a daily basis.
In this post, I will explain the process of Downloading, Installing and Configuring the Jenkins as a Windows Service.
Apart from installing Jenkins from command line as explained here, you can also install it by downloading it on a Windows Machine:

Follow the below the steps for Downloading, installing and Configuring Jenkins:
1. Before installing Jenkins, browse localhost:8080 in any browser and make sure that nothing got loaded onto the page as shown below:
Note: "This site can't be reached" needs to be displayed.

2. Also make sure that Java 7 or 8 is installed on your machine as shown below:
Without installing above Java versions, we cannot install / use Jenkins.
Note: Open command prompt and execute the command 'java -version' to find the Java version installed on your machine.

3. Open https://jenkins.io/ in any browser and click on 'Download' option on the page to download Jenkins:

4. Scroll down a bit and select the 'Windows' option under the 'Weekly' section as shown below:

5. Jenkins will be download from the Website as shown below:

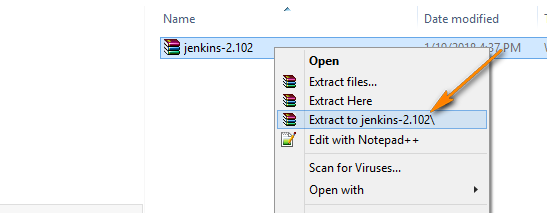
6. Extract the downloaded ZIP file as shown below:
7. Open the extracted folder and select to install the jenkins.exe in your machine as shown below:

8. Click on 'Next' and 'Install' buttons on the Installation Wizard as shown below:

9. Once the installation is done, close the Installation Wizard and browse localhost:8080 in any browser and observe that the Jenkins related information will be displayed on the screen as shown below:
Note: The below screen shot confirms that the Jenkins is installed on your machine.

10. Copy the path displayed on the "Getting Started" screen of Jenkins as shown below:

11. Open the above copied path in the Folder explorer as shown below:

12. Right click on the 'intialAdminPassword' and select to open the file in Notepad as shown below:

13. Copy the password displayed in the opened file as shown below:

14. Paste the above copied Password into the "Unlock Jenkins" page and click on 'Continue' as shown below:

15. Click on "Install suggested plugins" option as shown below:

16. "Getting Started" screen will be displayed and all the plug-ins shown below will be installed one by one as shown below:

17. Once all the plug-ins got installed, "Create First Admin User" screen will be displayed and provide all the required details and click on 'Save and Finish' button as shown below:

18. Observe that the Jenkins will be ready to use as shown below and click on 'Start using Jenkins' to get started

19. Observe that Jenkins dashboard will be displayed as shown below and you are all set to use Jenkins:

Hence by following the above steps, we can download, install and configure Jenkins in our machines.
No comments:
Post a Comment