


Lets start with the below topic:
Downloading and Installing IntelliJ Idea IDE:
Follow the below steps for Downloading and Installing IntelliJ Idea IDE:
1. Open Google.com in any browser and search for 'IntelliJ Idea IDE download' as shown below:

2. Click on the below highlighted link from the search results:

3. In the displayed IntelliJ Idea IDE page, click on 'Download' option for Community edition as shown below:
Note: Community edition is the free and powerful edition from IntelliJ IDEA

4. .exe file of IntelliJ Idea community edition will get downloaded as shown below:

5. Double click on the downloaded .exe file of IntelliJ Idea IDE as shown below:

6. Click on 'Next' button on the 'IntelliJ Idea IDE' Installation wizard as shown below:

7. Click on 'Next' button on the 'Choose Install Location' wizard screen as shown below:

8. Select '32 bit launcher' & Java options and click on 'Next' button as shown below:

9. Click on 'Install' button on the wizard as shown below:

10. Click on 'Finish' button on the Installation Wizard as shown below:

Installing Java JDK
Before launching IntelliJ IDE, we have to install the JDK version of Java.
Follow the below steps for installing the JDK version of Java.
11. Open Google.com in any browser and search for 'Java JDK download' as shown below:

12. Click on the below highlighted link from the search results:

13. In the displayed Oracle Java download page, click on 'Download' option for Java Platform as shown below:

14. Select 'Accept license Agreement' option and click to download 32 bit version of Java JDK which is compatible with windows as shown below:

15. Observe that the 32 bit version of Java JDK for windows will be downloaded as shown below:

16. Double click on the downloaded Java JDK .exe file to install the 32 bit version of Java JDK for windows:

17. Click on the 'Next' button on the displayed installation wizard of Java JDK:

18. Click on 'Next' button again and observe that the extraction will be begin as shown below:

19. Click on 'Next' button on the Destination folder wizard screen:

20. Observe that the installation of Java JDK will begin as shown below:

21. In the successful installation wizard screen, click on 'Close' button to complete the installation:

22. To confirm whether the Java JDK has successfully installed on your machine, launch the command prompt and execute 'java -version' command as shown below:

23. Observe that the version of installed Java will be displayed in the command prompt as shown below:

Launching IntelliJ IDE and creating a Java Project:
As the required IntelliJ Idea IDE and Java JDK are installed. Lets now follow the below steps for launching the IntelliJ IDE and create a new Java Project:
24. Double click on the shortcut which got created on the Desktop as shown below:

25. As you are installing IntelliJ Idea for the first time, select the second radio option and click on 'OK' button as shown below:

26. Click on the 'Skip All and Set Defaults' button on the 'Customize IntelliJ IDEA' dialog shown below"

27. Click on 'Create New Project' option in the resultant dialog as shown below:

28. Verify that the Java option is selected by default, JDK version of Java is displayed as selected in 'Project SDK' field and click on 'Next' button:

29. Click on 'Next' button in the resultant dialog:

30. In the resultant dialog, provide the Project name as 'JavaOnIntelliJ' as shown below:

31. Provide any desire location to store the Java project and click on 'Finish' button as shown below:

32. Close any IntelliJ Tip dialogs and observe that the Java project will be created and displayed with the provided details in the IntelliJ Idea IDE as shown below:

Executing the Selenium Automation scripts in IntelliJ Idea IDE:
Lets follow the below steps for executing the Selenium Automation scripts in the IntelliJ Idea IDE:
33. Right click on the Project and select 'New' > 'Directory' as shown below:

34. In the displayed 'New Directory' dialog, enter any folder name say 'libraries' and click on 'OK' button as shown below:

35. 'libraries' folder will be created as shown below:

36. Lets download the Selenium 3 Jar files and copy them into the newly created 'libraries' folder. First, open http://www.seleniumhq.org/download page in any browser as shown below:

37. Click to download the latest Java version of Selenium as shown below:

38. Latest Java version of Selenium will be downloaded as shown below:

39. Extract the downloaded Zip file and open the extracted folder as shown below:

40. Copy the Jar file inside the extracted folder as shown below:

41. Paste the copied Jar file into the 'libraries' folder as shown below:

42. Open the 'lib' folder in the extracted folder as shown below:

43. Copy all the Jar files in the 'lib' folder as shown below:

44. Paste the copied Jar files into the 'libraries' folder as shown below:

45. Now, we have to configure the Jar files inside the 'libraries' folder of the project. In order to configure, Select 'File' > 'Project Structure' as shown below:

46. In the displayed 'Project Structure' dialog, select 'Modules' option as shown below:

47. Select 'Dependencies' tab as shown below:

48. Click '+' option and select 'JARS or directories' option as shown below:

49. In the resultant dialog, select all the JAR files under the 'libraries' folder and click on 'OK' button as shown below:

50. All the selected Jar files will be displayed under 'Dependencies' tab and click on 'OK' button as shown below:

51. All the Jar files will be displayed as configured in the 'libraries' folder of the Project as shown below:

52. Create a new Java Class in the Project. Right click on the 'src' folder of the Project and select 'New' > 'Java Class' option as shown below:

53. In the displayed 'Create New Class' dialog, enter any Class name say 'SeleniumDemo' and click on 'OK' button as shown below:

54. 'SeleniumDemo' class will be created as shown below:

55. Create the 'main' method inside the class as shown below:

56. Create a driver object for FirefoxDriver class as shown below:

57. Click on 'WebDriver' interface and press 'Alt' and 'Enter' keys on your keyboard at the same time and select to import the required Selenium Interface to resolve the error as shown below:

58. Observe that the error with 'WebDriver' interface got resolved as shown below:

59. Repeat the same with 'FirefoxDriver' class, by selecting it and pressing 'Alt+Enter' keys together and select to import the required FirefoxDriver Class to resolve the error as shown below:

60. Observe that the error with 'FirefoxDriver' class got resolved as shown below:

61. Write the remaining Selenium code to navigate to http://www.omayo.blogspot.com, click on 'Selenium143' link on the page and close the browser as shown below:

62. Lets run the Selenium code. Right click on the Class Name and select 'Run' option as shown below:

63. 'IllegalStateException' will be displayed as shown below:

64. From the above error message, its clearly mentioned that we have to set the 'webdriver.gecko.driver' property. We will write the below code to set the required property:

65. Copy the 'webdriver.gecko.driver' from the error message and paste it as shown below:

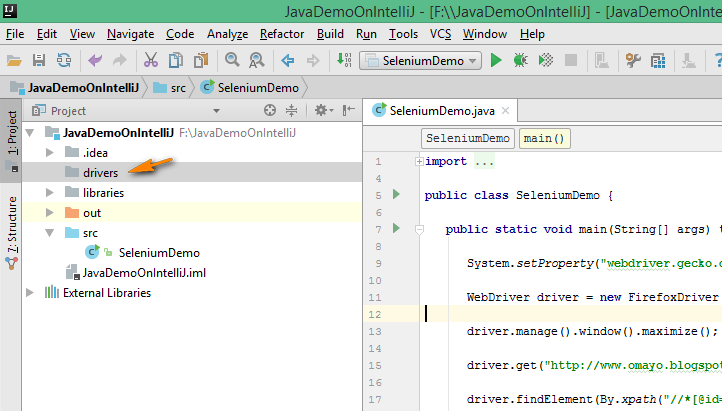
66. Now, create a 'drivers' folder in the Java Project as shown below:
67. Go to http://www.seleniumhq.org/download/ and click on the latest GheckoDriver.exe download link as shown below:

68. In the resultant page, click to download the 32 bit version of Gecko driver as shown below:

69. 32 bit version of GeckoDriver.exe zip file will be downloaded as shown below:

70. Extract the downloaded Zip file and open the extracted folder as shown below:

71. Copy the geckodriver.exe in the above opened folder as shown below:

72. Paste the copied geckodriver.exe file into the 'drivers' folder as shown below:

73. Now provide the path of the pasted 'geckodriver.exe' under the drivers folder in the Selenium code as shown below:

74. Now, we have the Java Project configured with the latest version of Selenium 3 Jar files, the latest Firefox browser and the latest version of geckodriver.exe file along with its path set in the Selenium code. Lets execute the Selenium 3 Automation code in IntelliJ Idea editor as shown below:

75. On executing the above code, Firefox browser will be launched, User will be navigated to http://www.omayo.blogspot.com application, 'Selenium143' link on the page will be clicked and hence the user will be navigated to http://www.selenium143.blogspot.com page and finally the browser will close. And finally, the below output will be displayed in the IntelliJ Idea IDE as shown below:

Conclusion:
Selenium Code can be executed using any of the editors like Eclipse IDE and IntelliJ Idea IDE. As the name suggests IntelliJ Idea IDE is more intelligent than Eclipse IDE and makes your job more easier. To know, how IntelliJ Idea is better, there is no other way than using this IDE. The more you use IntelliJ Idea IDE, the more you will understand its benefits over Eclipse IDE.
No comments:
Post a Comment